
The Pro’s Guide: How to Get Rid of Moss on Your Roof for Good
That green, velvety carpet on your roof might look charming, like something from a storybook cottage, but it’s a silent killer for your home. In the United States, especially in the damp, shaded climates of the Pacific Northwest, the Northeast, and the humid Southeast, roof moss is a destructive force. It’s not just a cosmetic issue; it’s an active threat to the structural integrity of your roof. That moss holds moisture like a sponge, preventing your shingles from drying. In the winter, this trapped water freezes and expands, lifting shingles, creating cracks, and inviting water to seep past your roof underlayment and into your attic. This can lead to wood rot, ceiling stains, and a host of expensive problems that go far beyond a simple cleaning. In some cases, a severe moss infestation can be grounds for an insurance company to threaten cancellation of your homeowner’s policy, as they know it’s a direct precursor to major claims. If left unchecked for years, what starts as a green sheen can easily escalate into a full-blown crisis, potentially leading to a premature roof replacement for a 3000 sq ft house, a cost that can run into tens of thousands of dollars.
This comprehensive guide is designed for the U.S. homeowner who wants to tackle this problem correctly and safely. We’re going to cover everything, from the non-negotiable safety precautions you must take before you even step on a ladder, to the different methods for killing moss, the best Amazon products for the job, and the long-term prevention strategies that will keep it from ever coming back. This isn’t just about making your roof look new; it’s about protecting the single most important (and expensive) component of your home’s exterior. We’ll show you how to do it without damaging your shingles, poisoning your landscaping, or, most importantly, injuring yourself. Welcome to the definitive guide from Roof Insider on conquering roof moss.
What’s In This Guide
- Safety First: The Non-Negotiable Rules of Working on a Roof
- What is Moss and Why is it on My Roof?
- DIY vs. Calling a Pro: A Realistic Assessment
- Step-by-Step Guide: How to Safely Kill and Remove Roof Moss
- The Best Roof Moss Removers & Tools (Amazon Picks)
- What NOT to Do: Common Mistakes That Ruin Roofs
- Long-Term Moss Prevention: How to Win the War
- Frequently Asked Questions (FAQ)
Safety First: The Non-Negotiable Rules of Working on a Roof
Before you even think about chemicals or brushes, we must have a serious talk about safety. Removing moss is one of the most dangerous DIY tasks a homeowner can attempt. Why? Because you are combining height with a surface that is *designed* to be slippery when wet, and the moss itself is slicker than ice. A fall from a one-story roof can be catastrophic. Do not, under any circumstances, cut corners on safety.
- GEAR UP: This is not a job for sneakers and a t-shirt. You need a complete safety system. This includes a properly-fitted fall protection kit, which contains one of the best roof harnesses, a sturdy anchor, and a strong lifeline. You also need dedicated, high-traction footwear; the best roofing shoes are designed to grip shingle granules in a way no other shoe can.
- LADDER SAFETY: Your ladder is your bridge to the work area. Ensure it’s one of the best roof ladders available, rated for your weight, and placed on firm, level ground. Use a 4-to-1 ratio (for every 4 feet of height, the base should be 1 foot out) and make sure it extends 3 feet above the roofline. Secure it at the top and bottom.
- THE BUDDY SYSTEM: Never work on a roof alone. Ever. Have a “ground person” who can monitor your safety, pass you tools, and call for help immediately if something goes wrong.
- KNOW YOUR PITCH: A low-slope, walkable roof is very different from a steep 12/12 pitch. Be realistic about your ability. If your roof is extremely steep, you must know can you walk on a tile roof (hint: it’s very risky and requires specific techniques) or can you walk on a metal roof (also risky, as they are slick). If you have any doubt, call a professional.
- WATCH THE WEATHER: Never work on a roof that is wet, frosty, or in high winds. The ideal day is overcast, calm, and dry—this prevents the chemicals from evaporating too quickly and keeps you from baking in the sun.
What is Moss and Why is it on My Roof?
Moss is a simple, non-vascular plant that gets its nutrients from the air and water, not from roots. It thrives in damp, dark, acidic environments. Your roof, especially the north-facing side that gets minimal sun, is a perfect habitat. The tiny nooks and crannies between your asphalt shingles are ideal places for spores to land, germinate, and grow.
The “perfect storm” for a moss infestation includes:
- Shade: Overhanging tree branches are the number one culprit. They block sunlight and drop debris.
- Moisture: High humidity, frequent rain, and poor drainage (like clogged gutters) create a constantly damp surface.
- Debris: A layer of leaves, pine needles, and dirt on your roof decomposes, creating a compost-like soil for moss to grow in.
- Acidity: Shingle granules, made of limestone, are slightly alkaline, which moss doesn’t love. But as the roof ages and is exposed to acid rain, the surface becomes more hospitable.
The damage cycle is slow but relentless. The moss colony traps water against the shingle. In cold climates, this water freezes, expands, and lifts the shingle’s edges. This breaks the factory seal, cracks the shingle, and dislodges the protective granules. Once the granules are gone, the asphalt underneath is exposed to UV rays, rapidly accelerating its decay. The water then finds its way to the nail holes and underlying roof flashing, causing rust and leaks. This is especially true in complex roof areas like valleys or around a roof cricket, where water and debris naturally collect.
DIY vs. Calling a Pro: A Realistic Assessment
This is a critical decision point. Can you, as a homeowner, do this yourself? Absolutely. Should you? That depends on your answers to these questions:
When to DIY:
- Your roof is a single story and has a low, walkable pitch.
- The moss infestation is light to moderate, not a 3-inch-thick mat.
- You are physically fit, comfortable with heights, and have a safety partner.
- You are willing to invest in the proper safety gear (harness, shoes, ladder), which can cost $200-$300 upfront.
- You are patient and will follow the “low-and-slow” chemical approach, not resorting to destructive high-pressure washing.
When to Call a Pro:
- Your roof is two or more stories high.
- Your roof is steep (anything over a 6/12 pitch).
- You have a tile or metal roof, which are extremely slippery and easily damaged by walking.
- The moss is extremely thick, indicating potential underlying shingle or decking damage.
- You are not comfortable with heights or don’t have the required safety equipment.
A professional service will have a two-person crew, full OSHA-compliant safety gear, and commercial-grade cleaning solutions. They also carry liability insurance, so if a worker is injured or your roof is damaged, you are covered. A pro might also use a drone for roof inspections to get a clear picture before starting. The roof inspection cost is often bundled with the cleaning, which typically runs from $400 to $1,000, depending on the house size. A professional roofer will also arrive with a full kit, including a roofing tool belt stocked with roofing hammers and pry bars, allowing them to spot-fix any lifted shingles or flashing they find, something a homeowner might miss. When you consider the cost of safety gear, the products, and your time, the pro’s fee suddenly looks very reasonable. You’re not just paying for the cleaning; you’re paying for the experience, the speed, and the safety. The answer to how much do roofers make is often justified by the high-risk, high-skill nature of their work.
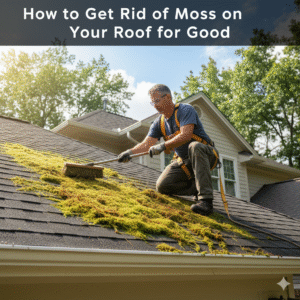
Step-by-Step Guide: How to Safely Kill and Remove Roof Moss
If you’ve weighed the risks and are proceeding with the DIY method, this is the safe and effective way to do it. The key is **patience**. The goal is to *kill* the moss and let it decay, not to *scrape* it off while it’s alive and anchored to your shingles.
-
Step 1: Assess, Plan, and Wait for the Right Day
Do not start this project on a whim. Wait for a weather window of at least 2-3 days with no rain. The ideal day is cool and overcast, which keeps the cleaning solution from evaporating too quickly. A hot, sunny day is the worst time, as the product will dry in minutes. Before you buy anything, get on your ladder (safely!) and inspect the roof. Look for problem areas. Are there roof windows or sensitive plants below that you’ll need to cover? Is the moss thickest around a specific tree? This is your planning phase.
-
Step 2: Gather Your Tools & Products
Get everything ready *before* you go up. Running up and down the ladder is inefficient and dangerous. You will need:
- **Safety Gear:** Harness, lifeline, anchor, non-slip roofing shoes, safety glasses, and chemical-resistant gloves.
- **Cleaning Product:** One of the moss killers listed in our Amazon guide below.
- **Applicator:** A simple garden pump sprayer. Do NOT use a pressure washer.
- **Garden Hose:** A standard hose with a gentle spray nozzle (for rinsing *before* and *after*, and for protecting plants).
- **Ladder & Ladder Stabilizer:** To prevent the ladder from shifting or damaging the gutter.
- **Plastic Sheeting:** To cover all shrubs, flowers, and landscaping below the roof’s drip line. Most roof cleaners are toxic to plants.
- **(Optional) Soft-Bristle Brush:** A long-handled, very soft-bristle brush. This is *only* for gently dislodging dead moss *after* the chemical has worked.
-
Step 3: Prepare the Area and Roof Surface
First, protect your property. Thoroughly soak all plants, shrubs, and grass below the work area with plain water from your hose. Then, cover them with plastic sheeting. The water provides a buffer if any chemicals drip, and the plastic provides a physical barrier.
Next, get on the roof (using your harness!) and clear any loose debris. Use a leaf blower or a very soft brush to remove leaves, pine needles, and twigs. This exposes the moss and allows your chemical to work directly on the plant, not on the dirt sitting on top of it. While you’re up there, check for other problems. Debris can attract pests, and it’s not uncommon to find signs that you may need bird spikes for your roof or that you have a rodent problem. If you see gnaw marks, you should learn are roof rats dangerous, as this indicates a separate, serious issue.
-
Step 4: Apply the Moss Killer (Low and Slow)
This is the main event. Mix your chosen product (like Wet & Forget or 30 Seconds) in your garden sprayer according to the manufacturer’s exact instructions. Do not “double-up” the concentration; this will not work better and will increase the risk of damaging your shingles and killing your plants.
Start at the roof’s ridge and work your way down, so you are always standing on a dry, untreated area. Thoroughly saturate all moss-covered sections. The moss should look wet and dark. Be sure to treat a few inches *around* the visible moss as well, to kill any invisible spores. Do not apply so much that it’s running in rivers down the roof. You want a heavy, soaking mist that stays put.
-
Step 5: Be Patient. Seriously. Walk Away.
This is the hardest part for most homeowners. **Do not rinse. Do not scrub.** The chemicals need time to be absorbed by the moss, kill it to the root (rhizoids), and break its bond with the shingle. This process takes *weeks*, not hours. Products like Wet & Forget are designed to work with the wind and rain over 2-6 months to slowly kill the moss and gently wash it away. Faster-acting products (like 30 Seconds) may turn the moss brown in a day, but it still needs time to detach. If you scrub now, you’ll be ripping live, anchored moss and taking your shingle granules with it.
-
Step 6: The Gentle Rinse (Months Later)
After a few months, you will notice the moss has turned brown, white, or yellow and is shrinking. Much of it will have washed away in the rain. At this point, you can use a standard garden hose (NO pressure washer) to gently rinse the dead, flaky debris off the roof, again working from the ridge down. If some dead moss remains, you can *gently* sweep it off with a soft-bristle brush. If it doesn’t come off easily, leave it. It’s dead and will eventually detach.
The Best Roof Moss Removers & Tools (Amazon Picks)
Choosing the right product is key. You want a solution that is effective on moss but gentle on your shingles and, as much as possible, on the environment. Here are the top-rated, homeowner-approved products available on Amazon.
1. Best “Set it and Forget It”: Wet & Forget Moss, Mold, Mildew & Algae Stain Remover

This is the professional’s choice for safe, long-term removal. It’s a non-caustic, non-acidic, and bleach-free formula. You simply spray it on and walk away. It works with the wind and rain over several months to kill the growth and gently clean the surface. It’s the safest option for your shingles and requires no damaging scrubbing or rinsing. One application can keep a roof clear for 1-2 years.
(+) Pros
- Extremely gentle on all roof types (asphalt, tile, metal).
- No scrubbing or rinsing required.
- Long-lasting preventative action.
- Bleach-free, non-acidic formula.
(-) Cons
- Requires extreme patience (takes 2-6 months for full results).
- More expensive per gallon than bleach-based formulas.
2. Best for Fast Results: 30 SECONDS Outdoor Cleaner

If you’re impatient and want to see results *now*, this is your product. It’s a sodium hypochlorite (bleach) based formula that works very quickly, often showing visible results in minutes and killing moss in 1-2 days. However, it *must* be rinsed off thoroughly, and you *must* protect your plants, as it will kill them on contact. It’s more aggressive, but very effective for tough, thick infestations that need to be cleared quickly.
(+) Pros
- Works extremely fast, often in minutes.
- Excellent for heavy, thick moss and black algae streaks.
- More affordable for large areas.
(-) Cons
- Bleach-based: Can harm plants and pets.
- Requires thorough rinsing.
- Can corrode aluminum gutters and roof flashing if not rinsed.
- No long-term preventative action.
3. Best Granular Product: Scotts MossEx Granular Moss Killer

For those who prefer not to use a liquid sprayer, granular products are a great alternative. You apply these granules dry to the roof (especially along the ridges), and the next rainfall dissolves them, releasing the moss-killing ingredients to wash down the roof. Scotts MossEx is a popular, effective formula that kills moss quickly without staining concrete or damaging the roof. It’s particularly good for preventative applications in the spring and fall.
(+) Pros
- Easy to apply (no mixing or spraying).
- Works with the rain.
- Kills moss quickly and won’t stain roofs.
- Also works on lawns.
(-) Cons
- Requires rain to activate (useless in a dry spell).
- Can be difficult to apply evenly on steep pitches.
- Heavy bags to haul up a ladder.
4. Best Long-Term Prevention: ZincShield Roof Moss Prevention Strips

This is not a moss *killer*, but a moss *preventer*. After your roof is clean, installing a strip of zinc (or copper) just below the ridge cap is the single best long-term solution. Every time it rains, the water leaches metallic ions from the strip, which are toxic to moss, algae, and fungus. This creates a “dead zone” down the roof where moss cannot grow. One installation can last for 20+ years, essentially solving the problem for the remaining life of your roof.
(+) Pros
- Permanent, 20+ year solution.
- Requires zero maintenance after installation.
- Safe for the environment (no harsh chemicals).
- Works 24/7, every time it rains.
(-) Cons
- Does not kill existing moss (must be applied to a clean roof).
- Requires installation, which means nailing it to the ridge (a simple job with a roofing nail gun).
What NOT to Do: Common Mistakes That Ruin Roofs
How you remove moss is just as important as what you use. Avoid these common, costly mistakes at all costs.
- NEVER Use a Pressure Washer: This is the cardinal sin of roof cleaning. A pressure washer, even on a “low” setting, blasts away the ceramic-coated granules that protect your shingles from the sun. Losing these granules will take 10-15 years off the life of your roof, instantly voiding its warranty. It can also force water *under* the shingles, soaking the underlayment and decking.
- NEVER Use Undiluted Bleach: Household bleach is corrosive. It will kill your landscaping, stain your siding, and, most importantly, corrode your metal components like gutters, downspouts, and critical roof flashing. Products like 30 Seconds are buffered and formulated for this use; plain bleach is not.
- NEVER Aggressively Scrape or Scrub: Using a stiff wire brush or an aggressive scraper is just as bad as pressure washing. You will be scraping the protective granules right off the shingle, permanently damaging it. Only a very soft brush on *dead* moss is acceptable.
Long-Term Moss Prevention: How to Win the War
Killing the moss is just one battle. Here’s how you win the war.
- Install Zinc or Copper Strips: As mentioned in our product guide, this is the #1 professional solution. Installing a strip of zinc or copper along all your roof ridges will create a permanent “no-go zone” for moss spores.
- Trim Overhanging Trees: This is non-negotiable. You MUST get sunlight and airflow to your roof. Trim any branches that are within 10 feet of your roofline. This will allow the roof to dry quickly after rain and stop the constant barrage of leaves and debris.
- Keep Gutters Clean: Clogged gutters create “dams” that cause water to back up onto the lower edge of your roof, keeping the shingles saturated. Clean them twice a year.
- Improve Ventilation: A hot, poorly ventilated attic can contribute to moisture issues on the roof deck. Ensure your roof exhaust fans and soffit vents are working properly to keep the entire system dry.
- Consider Moss-Resistant Shingles: If you’re due for a new roof, ask your contractor about algae- and moss-resistant (AR) shingles. These are manufactured with copper granules (like a built-in zinc strip) that prevent moss growth from day one.
Some homeowners also look into preventative treatments. While not a permanent solution, a product like Roof Maxx is a rejuvenation spray designed to restore flexibility to old shingles, which can make them less brittle and less prone to the cracking that moss exploits. However, it is not a moss killer and should only be applied to a clean roof.
Frequently Asked Questions (FAQ)
Q: How often should I treat my roof for moss?
A: If you use a gentle, long-acting product like Wet & Forget, one application can last 1-2 years or more. If you use a faster-acting (but less preventative) product, you may need to apply it annually. If you install zinc strips, you should never have to treat it again.
Q: What if I find shingle or flashing damage under the moss?
A: This is very common. Moss can hide a lot of sins. If you find a cracked shingle or a small hole, you can often perform a simple DIY repair with a high-quality roof sealant. For a larger tear or a damaged seam, a roll of roofing tape can provide a durable, waterproof patch. If you see that flashing around your chimney or in a valley has pulled away, it’s best to call a pro.
Q: Is it safe to use these chemicals on a metal roof?
A: Yes, but with caution. Gentle, non-bleach formulas like Wet & Forget are perfectly safe for metal roofs. Bleach-based products (like 30 Seconds) *can* be used, but they MUST be rinsed off *immediately* and thoroughly, as the bleach can tarnish the finish and corrode any unpainted fasteners. The bigger concern is safety: you can walk on a metal roof, but it is incredibly slippery when wet. A metal roof’s finish is also part of its appeal, so you should test any chemical on a small, hidden spot first to ensure it doesn’t affect the color, which is especially important if you have a custom painted metal roof. When installed in hot, sunny climates like Florida, metal roofs are good because they reflect heat. This is the opposite of the common myth that metal roofs make your house hotter. They are also less prone to moss than asphalt, but it can still grow in shaded areas or on a ridge vent for a metal roof.
Q: What about flat roofs?
A: Moss on a flat roof (like a TPO or EPDM membrane) is a sign of a much bigger problem: poor drainage. A flat roof should *never* have standing water. If moss is growing, it means you have permanent puddles. You need to address the drainage issue first (clogged drains, low spots) and then clean the moss, which is usually easier as it’s not anchored in granules. However, these roofs are highly specialized. If you have a flat roof in a hurricane zone, its integrity is critical, and you should call a commercial/flat roof specialist.
Q: What happens if I just leave the moss?
A: You will be buying a new roof much, much sooner than you planned. The moss will shorten a 30-year shingle’s life to 15 or 20 years. It will lead to leaks, which can damage your home’s insulation and structure. Eventually, your insurance company may send you a notice, and you could be faced with a massive, unexpected bill. If you’re wondering what happens if I don’t use my insurance money to fix my roof, the answer is that the damage will only get worse and will be fully out-of-pocket when you’re forced to replace it.