
What is Roof Flashing? A Pro Contractor’s Guide to This Critical Leak Defender
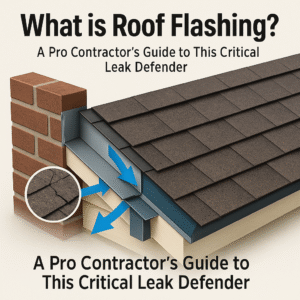
What is Roof Flashing?
Roof flashing is a thin, waterproof material, typically made of galvanized steel or aluminum, that is installed to direct water away from critical areas of a roof. It is used wherever the roof plane is interrupted or meets a vertical surface—such as at chimneys, walls, valleys, and vents—making it the single most important component in preventing leaks.
I once got a call from a frantic homeowner who had a massive water stain spreading across their living room ceiling. They had just paid for a new roof two years prior and couldn’t understand what went wrong. When I got up there, the shingles were perfect, but the flashing around the chimney was a disaster. The previous roofer had reused the old, corroded flashing and gobbed some tar on it as a “fix.” That simple, lazy shortcut cost the homeowner over $10,000 in interior water damage repairs. The culprit wasn’t the roof; it was a small, failed piece of metal.
Think of flashing as the raincoat for the most vulnerable joints of your house. Shingles or metal panels do a great job of shedding water on a wide, open slope, but where that slope runs into a wall, a chimney, or another roof plane, you have a seam. And without properly installed flashing, that seam is an open invitation for water. In this guide, we’ll cover every type of flashing you should know about, the materials they’re made from, how to spot failure, and why it’s the most important detail on your roof.
Why Flashing is Your Roof’s Most Important Defender
A roof doesn’t just deal with water falling straight down. It has to contend with wind-driven rain that pushes water sideways and even upwards, as well as melting snow and ice dams. Furthermore, water has a pesky habit of “clinging” to surfaces through capillary action, allowing it to wick into tiny gaps.
Flashing is an engineered system that counteracts these forces. It’s installed in layers, often woven between the roofing materials, to create a series of overlapping, waterproof channels. When this system fails, the results can be catastrophic:
- Hidden Wood Rot: Water gets behind the siding and into the roof decking and structural framing, causing slow, silent rot that can compromise your home’s integrity.
- Mold and Mildew: Trapped moisture in your attic and wall cavities is the perfect breeding ground for toxic mold, which can lead to serious health issues and costly remediation.
- Damaged Insulation: Wet insulation loses its R-value, becoming ineffective. This leads to higher energy bills as it impacts your home’s thermal performance, a key concern for those wondering if metal roofs make houses hotter.
- Interior Damage: The visible water stains on ceilings and walls are often the last sign of a long-term problem.
Discovering these issues early is key. This is why the modest roof inspection cost is a worthwhile investment, as a professional will always focus heavily on the condition of your flashing.
The Common Types of Roof Flashing: A Visual Guide
Flashing isn’t a single product; it’s a category of components, each designed for a specific job. Here are the most common types you’ll find on a residential roof in the U.S.
Step Flashing
Where it’s used: Where the edge of a sloped roof meets a vertical wall, like the side of a dormer or a second-story wall.
How it works: These are individual, rectangular pieces of metal bent at a 90-degree angle. They are installed in an overlapping, “woven” pattern with each course of shingles. One leg sits on the roof deck under the shingle, and the other runs up the wall, creating a step-like barrier against water.
Valley Flashing
Where it’s used: In the “V” shaped channel where two sloped roof planes meet.
How it works: This is typically a single, long piece of “W”-shaped metal that runs the entire length of the valley. The raised center rib prevents water rushing down one side from forcing its way up under the shingles on the other side. It’s a high-volume channel for water, so this flashing is absolutely critical.
Chimney Flashing
Where it’s used: Around the base of a chimney where it penetrates the roof.
How it works: This is a complex, multi-part system. It includes an “apron” flashing at the front, step flashing along the sides, and a “cricket” or “saddle” at the back to divert water around the chimney. Crucially, it also includes “counter-flashing,” which is a second layer of metal embedded into the chimney’s mortar joints and folded down over the top of the base flashing to create a two-layer seal.
Vent Pipe Flashing
Where it’s used: Around plumbing vents, exhaust pipes, and other small penetrations.
How it works: This is a single piece of flashing, often called a “boot,” with a flat base and a rubberized collar or metal cone that seals tightly around the pipe. The base is installed under the shingles on the high side and over the shingles on the low side to ensure water sheds properly around it.
Drip Edge
Where it’s used: Along all the edges of the roof (the eaves and rakes).
How it works: This L-shaped strip of metal is installed under the roofing material at the edge. It extends slightly past the fascia, creating a channel that directs water away from the underlying wood and directly into the gutters, preventing rot and protecting the fascia board.
Kickout Flashing
Where it’s used: Where a roof edge terminates against a vertical wall.
How it works: This is a small but essential piece of flashing with an outward-angled fin. Its sole job is to “kick” water away from the wall and into the gutter. Without it, water will run directly down the wall behind the siding, causing massive water damage. This is one of the most common and costly flashing mistakes I see.
Common Flashing Materials: Pros & Cons
The material your flashing is made from determines its lifespan, cost, and compatibility with your roofing. Different roof systems have different needs; for example, the flashing system for durable metal roofs is very different from that on a standard shingle roof.
| Material | Pros | Cons | Best For |
|---|---|---|---|
| Galvanized Steel | Affordable, strong, durable, can be painted. | Will eventually rust if the coating is scratched or wears away. | The most common choice for all-purpose flashing on shingle roofs. |
| Aluminum | Lightweight, rust-proof, easy to bend and cut. | Less durable than steel, can be corroded by mortar or treated wood. | DIY projects, painted applications, and compatible metal roofing systems. |
| Copper | Extremely long-lasting (100+ years), beautiful aesthetic patina, seams can be soldered. | Very expensive, requires skilled craftsmanship to install. | High-end homes, historic restorations, and slate or tile roofs. |
| PVC / Plastic | Inexpensive, pre-molded for specific uses like pipe boots. | Shorter lifespan, can become brittle and crack from UV exposure. | Vent pipe boots and other pre-fabricated applications. |
DIY Flashing Maintenance vs. Professional Replacement
Can you handle flashing issues yourself? It depends entirely on the problem. Minor maintenance is often within a handy homeowner’s grasp, but replacement is almost always a job for a professional.
DIY Task: Resealing and Minor Repairs
The sealant around flashing is its weakest link and often fails before the metal does. If you see cracked or peeling sealant, this is a potential DIY fix. You can carefully remove the old sealant and apply a fresh bead of a high-quality product. For a very small hole or crack away from a major seam, a piece of professional-grade flashing tape can serve as a durable patch.
Pro Job: Replacing Flashing Sections
Replacing a section of step flashing or valley flashing is a complex job. It requires tearing off the surrounding shingles, properly integrating the new flashing with the existing layers and underlayment, and then replacing the shingles correctly. One mistake can create a bigger leak than the one you were trying to fix. If you see rusted-through metal or a large, loose section of flashing, it’s time to call a pro.
Essential Products for DIY Flashing Maintenance
If you’re tackling minor maintenance, using professional-grade products is non-negotiable. This is not the place for cheap hardware store caulk.

1. Professional Grade Sealant: Geocel 2300
This is the kind of sealant the pros use. It’s a tripolymer formula that adheres to virtually any surface (even wet ones) and remains flexible for decades, resisting cracking from UV exposure and temperature changes. It’s the absolute best roof sealant for creating a long-lasting, watertight seal around your flashing edges.
Check Price on Amazon
2. High-Performance Flashing Tape: 3M 8067
This isn’t your average tape. 3M’s flashing tape has an incredibly aggressive acrylic adhesive that sticks and stays stuck, creating a permanent waterproof seal. It’s perfect for sealing the seams of a window or door flashing installation, or for making a durable emergency repair on a small puncture in a flashing panel. This is the best roofing tape for professional-level results.
Check Price on AmazonFrequently Asked Questions About Roof Flashing
How long should roof flashing last?
The flashing material itself should last as long as your roofing material, if not longer. Galvanized steel can last 20-30 years, while copper can last over 100. However, the sealants used around the flashing have a shorter lifespan, often needing inspection and maintenance every 5-10 years.
Does homeowners insurance cover failing flashing?
It depends on the cause of failure. If the flashing was damaged in a specific event like a hailstorm or high winds, it is typically covered. If it fails due to age, rust, or improper installation (i.e., a maintenance issue), it is usually not covered. This is why understanding your policy is so important, as is knowing what happens if you don’t use your insurance money for proper repairs.
What is counter-flashing?
Counter-flashing is the second layer of a two-part flashing system, most commonly used on chimneys. The base flashing is installed on the roof deck, and the counter-flashing is embedded into the chimney’s mortar joints and laps over the top of the base flashing. This creates a highly durable, water-shedding system where the roof and chimney can expand and contract independently without breaking the seal.
Can I inspect the flashing myself?
You can and should perform visual inspections from the ground with binoculars. However, a close-up inspection often requires getting on the roof. Given the risks of falls and the danger of damaging your roof if you don’t know if you can walk on a metal roof, for instance, a professional inspection is always the safest bet. During an inspection, professionals may also identify other issues, like the need to install bird spikes or address potential entry points for pests.
Final Verdict: Don’t Ignore Your Roof’s Most Important Detail
While flashing may only make up a tiny fraction of your roof’s surface area, it’s responsible for 100% of the protection at its most vulnerable points. A high-quality roofing material can be rendered useless by a cheap, improperly installed piece of flashing.
As a homeowner, being “flashing literate” is one of your best defenses against costly water damage. Understand what it is, where it is, and what it’s supposed to look like. Conduct regular visual inspections from the ground, and don’t hesitate to call a certified professional if you see anything that looks amiss. A small investment in flashing maintenance can save you from a catastrophic repair bill down the road.
Pingback: The Best Ways to Stop Roof Squirrels Permanently and Protect Your Attic