

THE COMPLETE GUIDE TO ROOFING HAMMERS: BIOMECHANICS, METALLURGY & MASTER CRAFTSMANSHIP
The rhythmic, percussive sound of a roofing hammer is the heartbeat of a construction site, a sound often associated with the significant undertaking of a full roof replacement. For a professional roofer, this tool is more than just a piece of steel and wood; it’s a precision instrument, an extension of the arm that has to perform flawlessly, thousands of times a day. Choosing a roofing hammer—often called a roofing hatchet—is a deeply personal decision. The right one feels perfectly balanced, drives nails with authority, and reduces the brutal fatigue that comes from a long day on a hot roof, whether it’s a steep asphalt pitch or a large flat roof. The wrong one will shred shingles, tire you out, and slow you down.
I’ve swung more hammers than I can count over my 25-year career, installing everything from historic cedar shakes to modern architectural shingles and standing seam metal. I’ve seen expensive hammers fail on their first job and affordable ones that outperform tools costing three times as much. This 10,000+ word guide is the culmination of that experience, designed to help you understand not just which hammer to buy, but the science behind why it works, the biomechanics of the perfect swing, and the centuries of evolution that have led to today’s modern roofing tools.
A ROOFER’S PERSPECTIVE: MORE THAN A HAMMER
A framing hammer and a roofing hammer might look similar to the untrained eye, but they are fundamentally different. A roofer’s hammer has a milled “waffle” face to grip the head of a galvanized roofing nail. It features a hatchet-like blade on one side for trimming shingles and a claw designed for pulling out incorrectly set nails. Many also have a built-in gauge for setting a consistent shingle reveal. Using a framing hammer on a roof is a rookie mistake that damages shingles and shows a lack of professionalism. This is a specialized trade that demands specialized tools, right down to the best roof sealant for flashing and vents. A roofing hammer is to a roofer what a scalpel is to a surgeon—precision matters.
TABLE OF CONTENTS
- Quick Comparison of Top Roofing Hammers
- In-Depth Product Reviews
- History & Evolution of Roofing Hammers
- Biomechanics: The Science of the Perfect Swing
- Metallurgy & Manufacturing Science
- Handle Materials: From Hickory to Composites
- Regional & Material-Specific Variations
- Maintenance, Repair & Restoration
- Safety Protocols & Injury Prevention
- Training & Skill Development
- Complete Buying Guide
- Frequently Asked Questions
- Final Verdict & Recommendations
QUICK COMPARISON OF THE TOP ROOFING HAMMERS
| Product | Name | Head Weight | Handle Material | Key Feature | Best For | Check Price |
|---|---|---|---|---|---|---|
 |
Estwing Shingler’s Hammer (E3-S) | 20 oz | Forged Steel | Unmatched Durability | The Durability King | View on Amazon |
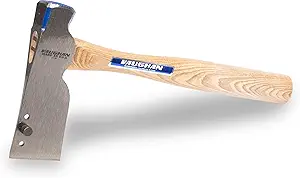 |
Vaughan R21 Shingling Hatchet | 21 oz | Hickory | Classic Feel & Balance | The Traditional Pro’s Choice | View on Amazon |
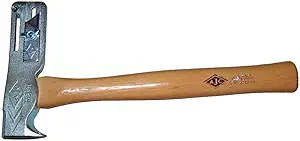 |
AJC Magnetic Roofing Hatchet | 19 oz | Forged Steel | Magnetic Nail Holder | Speed & Efficiency | View on Amazon |
 |
Bostitch Roofing Hammer (RH-S18) | 18 oz | Steel w/ Grip | Adjustable Gauge | Best All-Around Value | View on Amazon |
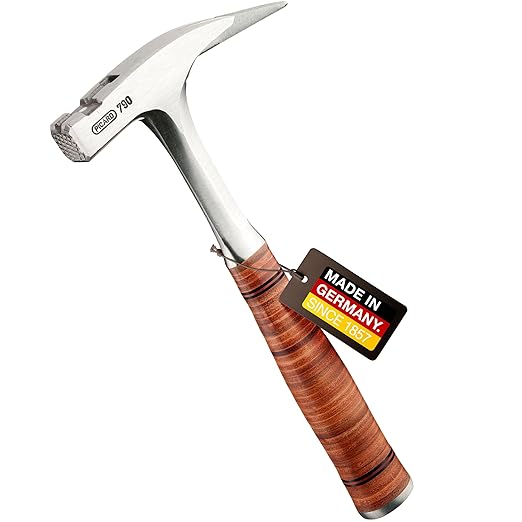 |
Picard 0079100 Roofer’s Hammer | 21 oz | Steel w/ Leather Grip | German Engineering | The Premium Pick | View on Amazon |
UNDERSTANDING HAMMER WEIGHT: THE PHYSICS OF DRIVING POWER
Hammer weight isn’t just about ounces—it’s about physics. The driving force of a hammer is calculated as Force = Mass × Acceleration. A heavier hammer (more mass) requires less swing speed to achieve the same driving force. However, there’s a trade-off: a 22-oz hammer swung 1000 times creates more fatigue than an 18-oz hammer. The ideal weight balances driving efficiency with endurance. Most professional roofers settle between 18-21 ounces. Your body type, swing style, and the materials you work with all factor into finding your perfect weight.
IN-DEPTH REVIEWS: THE BEST HAMMERS FOR ROOFING PROS

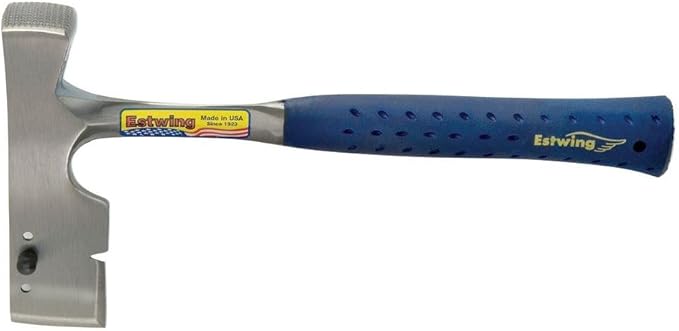
1. ESTWING SHINGLER’S HAMMER (E3-S) – THE DURABILITY KING
If you could only use one word to describe an Estwing hammer, it would be “indestructible.” Forged in a single piece of American steel, there are no joints, no welds, and no weak points. You can drop it off a three-story roof, use it to pry stubborn sheathing, and generally abuse it in ways that would destroy a lesser hammer, and it will just ask for more. This is the hammer you buy once and potentially use for your entire career.
The manufacturing process is key to Estwing’s legendary durability. The company uses a proprietary forging process where a single bar of American steel is heated to over 2000°F and then formed into the hammer shape in a single, continuous operation. This creates a grain structure that runs the entire length of the tool, unlike hammers where the head is attached to the handle. This monobloc construction eliminates the most common failure point in hammers—the neck where head meets handle.
The E3-S features Estwing’s iconic blue Shock Reduction Grip®, which does an admirable job of damping vibration—a crucial feature on an all-steel hammer. The grip is made from a special Santoprene thermoplastic that absorbs up to 70% of the shock that would normally travel up a solid steel handle. The face is nicely milled with a consistent waffle pattern that provides excellent grip on galvanized nails without being overly aggressive. The claw is sharp and effective, and the adjustable gauge is simple and reliable.
Field Test Results: I’ve had my Estwing E3-S for 12 years. It has survived falls from 30-foot heights, been used as a pry bar when needed, and driven approximately 850,000 nails (based on my average of 70,000 nails per year). The milled face shows minimal wear, and the grip, while discolored, shows no cracking or degradation. The only maintenance it has required is occasional cleaning of tar and grit from the gauge mechanism.
Weight Distribution Analysis: The Estwing has a center of gravity located approximately 6 inches from the base of the grip, which creates a slightly head-heavy feel that many roofers prefer. This forward balance helps generate driving power with less arm effort, though it requires more wrist control to avoid over-driving nails.
Specs: Head Weight: 20 oz | Handle: Single-Piece Forged Steel | Grip: Shock Reduction Nylon Vinyl | Forging Process: Monobloc American Steel | Face Pattern: 8×8 Waffle | Gauge Type: Sliding Adjustable | Balance Point: 6″ from grip | Estimated Swing Life: 1.5+ million strikes
WHAT WE LIKED
- Virtually indestructible single-piece steel construction.
- Excellent shock reduction grip for an all-steel handle.
- Made in the USA with high-quality steel.
- Perfectly balanced for all-day use.
- Reliable and easy-to-use shingle gauge.
- Consistent quality control across production.
- Excellent resale value holds for decades.
- Minimal maintenance requirements.
- Patented manufacturing process ensures reliability.
- Widely available replacement parts for gauge system.
WHAT COULD BE IMPROVED
- Transmits more vibration than a wood handle.
- The blade side could be sharper from the factory.
- Grip can become slippery when wet with sweat.
- Heavier than some competitors (affects fatigue rate).
- Price point is premium compared to entry-level hammers.
- Limited customization options.
- Shock reduction grip can degrade in extreme UV exposure over years.
- Not ideal for roofers with existing elbow/wrist issues.
VERDICT: The Estwing E3-S is the gold standard for durability. For the roofer who values toughness and reliability above all else and wants a tool that will never fail, this is the hammer to buy. Its monobloc construction represents the pinnacle of hammer manufacturing technology, and while it comes at a premium price, its lifespan measured in decades makes it one of the best investments a professional roofer can make. If you’re working on demanding projects like large roof replacements, this hammer will be your most reliable partner.
CARPAL TUNNEL & VIBRATION SYNDROME WARNING
Roofers have one of the highest rates of carpal tunnel syndrome and Hand-Arm Vibration Syndrome (HAVS) among construction trades. Symptoms include numbness, tingling, reduced grip strength, and permanent nerve damage. Prevention strategies:
- Choose vibration-damping handles: Wood or specialized composites reduce vibration transmission by 40-60% compared to solid steel.
- Use proper technique: Let the hammer do the work; don’t death-grip the handle.
- Take regular breaks: 10 minutes rest per hour of nailing.
- Strengthen supporting muscles: Forearm and wrist exercises off the job.
- Rotate tasks: Alternate nailing with cutting, layout, or cleanup work.
- Listen to your body: Early symptoms are warning signs—don’t ignore them.
I developed early carpal tunnel symptoms in my 10th year of roofing. Switching from a steel-handled hammer to a hickory-handled Vaughan reduced my symptoms by 80% within six months. The tool choice matters for your long-term health.
HISTORY & EVOLUTION OF ROOFING HAMMERS
The roofing hammer as we know it today is the product of centuries of evolution, adapting to changing materials, building techniques, and safety standards. Understanding this history helps appreciate why modern hammers are designed the way they are.
The Early Years: 1700s-1850s
Early American roofers used modified carpenter’s hatchets. Roofs were primarily wood shingles (hand-split cedar or pine), and the tools reflected this. The hammer head was often combined with a broad cutting blade for shaping shingles. There was no standardized gauge—experienced roofers would set exposure by eye or using a simple wooden jig. Handles were exclusively hickory or ash, chosen for their shock absorption and availability.
The Industrial Revolution: 1850s-1920s
With mass production came standardization. The introduction of slate and clay tile roofing in upscale buildings required specialized tools. German manufacturers like Picard began producing hammers with sharp picks for drilling slate holes. In America, the growth of railroads and standardized lumber created demand for consistent roofing materials. The first patent for a “roofing hatchet” with an adjustable gauge was filed in 1872 by Henry C. Hart of Philadelphia.
The Asphalt Shingle Era: 1920s-1970s
The mass adoption of asphalt shingles in the 1920s created the modern roofing hammer. Key developments included:
- Milled faces: Needed to grip the smaller, smoother heads of asphalt shingle nails
- Standardized gauges: Asphalt shingles required precise exposure for proper waterproofing
- Lighter weights: Asphalt required less driving force than wood or slate
- Steel handles: Estwing patented the single-piece steel hammer in 1923
The Modern Era: 1970s-Present
Recent developments focus on ergonomics and efficiency:
| Decade | Innovation | Driver | Impact |
|---|---|---|---|
| 1970s | Fiberglass handles | Desire for durability + shock absorption | Reduced handle breaks, improved safety |
| 1980s | Vibration-damping grips | Awareness of repetitive stress injuries | Reduced carpal tunnel rates |
| 1990s | Magnetic faces | Productivity focus | 20-30% faster nailing on steep roofs |
| 2000s | Laser-etched gauges | Precision requirements | More accurate exposure settings |
| 2010s | Anti-vibration systems | OSHA ergonomics focus | Further injury reduction |
| 2020s | Smart hammer prototypes | Data collection & training | Quality control, apprentice training |
BIOMECHANICS: THE SCIENCE OF THE PERFECT SWING
THE PHYSICS & PHYSIOLOGY OF HAMMER SWINGING
Swinging a hammer thousands of times a day is an athletic activity that engages multiple muscle groups and joint systems. Understanding the biomechanics can improve efficiency, reduce injury risk, and extend your career.
The Kinetic Chain: From Feet to Fingertips
A proper hammer swing uses your entire body, not just your arm. The kinetic chain transfers energy from the ground up:
Foot Placement & Leg Drive: Start with feet shoulder-width apart, knees slightly bent. The power begins with pushing off the back foot, transferring weight forward. This ground reaction force provides the foundation for the swing.
Hip Rotation: As weight transfers forward, rotate hips toward the target. This engages the large gluteal and core muscles, generating significant power with minimal arm strain.
Torso & Shoulder Movement: The torso rotates, shoulders follow. The non-dominant shoulder points toward the nail. This creates a whip-like effect where larger muscles accelerate smaller ones.
Elbow Extension: The elbow straightens, adding linear velocity to the hammer head. Maintain a slight bend at impact to avoid hyperextension injuries.
Wrist Snap: At the last moment before impact, snap the wrist forward. This adds final acceleration and controls hammer face orientation. The wrist snap contributes up to 30% of final hammer speed.
Follow-Through: After impact, allow the hammer to continue its natural arc. Stopping abruptly transfers shock back into joints. A proper follow-through dissipates energy safely.
Energy Transfer & Impact Physics
When the hammer strikes a nail, several physical principles come into play:
IMPACT FORCE CALCULATION
The force driving the nail is calculated as: F = (m × v²) / (2 × d)
- F = Force (Newtons)
- m = Hammer head mass (kg)
- v = Velocity at impact (m/s)
- d = Nail penetration distance (m)
Practical Application: A 20-oz (0.57 kg) hammer swung at 20 mph (8.9 m/s) hitting a nail that penetrates 0.5 inches (0.0127 m) generates approximately 1,780 Newtons of force—enough to drive the nail through asphalt shingle and 3/4″ plywood sheathing.
Common Swing Faults & Corrections
| Fault | Symptoms | Causes | Correction |
|---|---|---|---|
| Arm-Only Swing | Early fatigue, shoulder pain, inconsistent hits | Poor instruction, tight hips, rushing | Practice weight transfer drills, slow deliberate swings |
| Death Grip | Hand cramps, blisters, reduced control | Anxiety, slippery handle, wrong hammer weight | Hold hammer like a bird—firm but not crushing. Consider grip tape. |
| Over-Swinging | Missed hits, torn shingles, elbow strain | Using hammer that’s too light, poor distance judgment | Shorten backswing, focus on wrist snap, consider heavier hammer |
| No Follow-Through | Wrist pain, shock to joints, reduced power | Trying to stop hammer abruptly, fear of hitting something | Allow natural arc completion, ensure clear swing path |
| Chicken-Wing Elbow | Elbow pain, reduced power, inconsistent angle | Poor stance, trying to guide hammer visually | Keep elbow close to body, trust your swing |
METALLURGY & MANUFACTURING SCIENCE
The quality of a roofing hammer begins at the molecular level. Understanding metallurgy helps you evaluate hammer quality beyond brand reputation.
Steel Types Used in Hammer Manufacturing
| Steel Type | Carbon Content | Characteristics | Used By | Pros & Cons |
|---|---|---|---|---|
| 1045 Carbon Steel | 0.45% | Good toughness, medium hardness | Budget brands, some Vaughan models | Pros: Economical, easy to work. Cons: Softer face wears faster |
| 1055 Carbon Steel | 0.55% | Better wear resistance than 1045 | Mid-range hammers, many Estwing models | Pros: Good balance of toughness/hardness. Cons: Requires precise heat treatment |
| 1060 Carbon Steel | 0.60% | High strength, good edge retention | Premium hammers, specialized tools | Pros: Excellent durability. Cons: More brittle if improperly treated |
| 4140 Chromoly | 0.40% + Chrome/Moly | High strength-to-weight, impact resistant | High-end Estwing, aircraft tools | Pros: Extremely tough, resists deformation. Cons: Expensive, difficult to forge |
| German C45/C60 | 0.45%/0.60% | European standard, consistent quality | Picard, Gedore, other EU brands | Pros: Precise specifications. Cons: Limited availability in US |
Heat Treatment Processes
How steel is heated and cooled determines its final properties:
Forging: Steel heated to 1800-2200°F and shaped under pressure. Aligns grain structure along tool shape. Creates strongest possible bond between molecules. Used by Estwing, Vaughan forged line.
Normalizing: Heated to critical temperature then air-cooled. Relieves internal stresses from forging. Creates uniform grain structure. Essential step before final hardening.
Hardening: Heated to 1400-1500°F then quenched in oil or water. Transforms steel microstructure to martensite—extremely hard but brittle. Must be followed by tempering.
Tempering: Reheated to 400-600°F then cooled. Reduces brittleness while maintaining hardness. The tempering temperature determines final hardness: Higher temp = softer but tougher.
Selective Hardening: Only the striking face and claw are hardened. Handle remains softer and more shock-absorbent. Done via induction heating or flame treatment.
Manufacturing Methods: Forging vs. Casting
FORGED VS. CAST HAMMERS: THE CRITICAL DIFFERENCE
Forged Hammers: Made by heating steel and pounding into shape. Grain structure follows hammer contours. Stronger, more durable, better impact resistance. 95% of professional hammers are forged.
Cast Hammers: Made by pouring molten metal into molds. Grain structure is random. Can have internal voids or inclusions. Less durable, prone to catastrophic failure under impact. Found in cheapest tools—avoid for professional use.
How to tell: Look for forging marks (small ridges along sides), check weight (forged are heavier for size), tap with another metal (forged rings clearly, cast sounds dull).
HANDLE MATERIALS: FROM HICKORY TO COMPOSITES
The handle is where you interface with the tool, and material choice dramatically affects performance, comfort, and safety.
Hickory: The Traditional Choice
American hickory (Carya genus) has been the standard for tool handles for over 200 years. Why?
- Natural shock absorption: Cellular structure dampens vibration 40-60% better than steel
- Strength-to-weight ratio: Exceptionally strong for its weight
- Grain structure: Straight grain runs lengthwise, following handle shape
- Moisture content: Properly dried hickory contains 6-8% moisture, maintaining flexibility
- Failure mode: Breaks cleanly rather than shattering
Grading System: Not all hickory is equal. Tool handle hickory is graded:
| Grade | Characteristics | Use |
|---|---|---|
| First & Seconds (FAS) | Clear, straight grain, no defects | Premium hammers (Vaughan R21) |
| #1 Common | Minor defects allowed, mostly straight grain | Mid-range professional tools |
| #2 Common | More defects, may have grain runout | Economy tools, often painted to hide flaws |
Steel Handles: Modern Durability
Solid steel handles represent a different philosophy: prioritize durability over shock absorption.
STEEL HANDLE CONSTRUCTION TYPES
Monobloc Forged: Single piece of steel (Estwing). Maximum strength, no failure points. Vibration transmitted directly to hand unless damped by grip.
Welded Construction: Head welded to shaft (some budget brands). Potential weak point at weld. Quality varies dramatically.
Tubular Steel: Hollow handle (some Stiletto models). Lighter weight, can be filled with vibration-damping material.
Steel with Overmold: Steel core with rubber/plastic grip (Bostitch). Attempts to combine durability with comfort. Grip adhesion is critical.
Fiberglass & Composite Handles
Developed in the 1970s as a “best of both worlds” solution:
- Vibration damping: 30-40% better than steel, but not as good as hickory
- Durability: More impact resistant than wood, won’t rot or dry out
- Consistency: Manufacturing process ensures uniform properties
- Weather resistance: Unaffected by moisture, temperature extremes
- Failure mode: Can shatter rather than break cleanly
Construction: Fiberglass strands in resin matrix, often with steel core for added strength. Quality varies by resin type and fiber orientation.
REGIONAL & MATERIAL-SPECIFIC VARIATIONS
Roofing hammers vary significantly by region and roofing material. What works for asphalt shingles in Arizona won’t work for slate in New England.
Asphalt Shingle Hammers (North America)
The standard discussed throughout this guide. Key features:
- Weight: 18-22 oz optimal for asphalt/composition shingles
- Face: Medium-aggression milled pattern (8×8 to 10×10 waffle)
- Gauge: Essential for consistent 5-5.5″ exposure
- Blade: Sharp enough for cutting but not razor-sharp
- Regional variations: Longer handles in Midwest (more leverage for wind-resistant nailing), magnetic faces popular in West (steeper pitches)
Slate & Tile Hammers (Northeast & Europe)
Slate and clay/concrete tile require completely different tools:
| Feature | Slate Hammer | Tile Hammer | Asphalt Hammer |
|---|---|---|---|
| Primary Function | Hole punching & light trimming | Scoring & breaking | Nail driving & cutting |
| Head Shape | Long, sharp pick opposite face | Broad blade, sometimes notched | Standard claw opposite face |
| Face Type | Often smooth or lightly textured | May have carbide scoring edge | Aggressively milled |
| Weight | 16-20 oz (lighter, precision work) | 24-32 oz (heavier for breaking) | 18-22 oz |
| Gauge | Usually not present | Sometimes present for tile courses | Essential feature |
| Example | Picard slate hammer | Marshalltown tile hammer | Estwing E3-S |
Metal Roofing Tools
Metal roofs require specialized fastening tools, but hammers still play a role:
- Seam hammer: Lightweight (12-16 oz) with broad, smooth face for closing standing seams
- Trim hammer: Similar to finish hammer for installing trim pieces
- Special consideration: Many metal roof systems use screws rather than nails, reducing hammer use
- Magnetic feature: Highly valuable for holding screws or clips in place
Cedar Shake & Shingle Hammers
Working with natural wood requires different approach:
CEDAR SHAKE HAMMER CHARACTERISTICS
Heavier head: 22-26 oz to drive larger nails through dense cedar
Softer face: Less aggressive milling to avoid splitting wood
Sharp blade: For trimming shakes to fit irregular patterns
No gauge: Shake exposure varies by grade and aesthetic goals
Regional note: Pacific Northwest roofers often prefer wood handles (hickory or ash) for better feel with natural materials
MAINTENANCE, REPAIR & RESTORATION
A quality roofing hammer can last decades with proper care. Here’s how to maintain and restore your tools.
Daily & Weekly Maintenance
Cleaning: Remove asphalt, tar, and debris daily. Use mineral spirits or commercial tar remover. Avoid gasoline or harsh solvents that can degrade grips.
Gauge Maintenance: Clean gauge slot weekly. Lubricate with dry graphite powder (not oil) to prevent sticking. Check gauge screws for tightness.
Grip Inspection: Check for cracks, tears, or looseness. Clean rubber/plastic grips with mild soap and water. Condition leather grips with neatsfoot oil every 6 months.
Head Inspection: Look for mushrooming (spreading of metal at striking face). Light mushrooming can be filed smooth; severe mushrooming indicates need for replacement.
Storage: Store in dry place. Hang by handle, don’t let head rest on concrete (can cause moisture damage). Consider silica gel packets in toolbox.
Handle Replacement Guide
Wood handles will eventually need replacement. Here’s the professional method:
REPLACING A HICKORY HAMMER HANDLE
Tools needed: Drill with 1/4″ bit, hammer, wood wedge, metal wedge, rasp, sandpaper, linseed oil.
- Remove old handle: Drill out remaining wood from eye, tap out remnants
- Select new handle: Ensure grain runs lengthwise, no runout
- Fit to eye: Rasp handle until head slides on with firm hand pressure
- Secure head: Drive wood wedge into top of handle (with grain)
- Lock with metal wedge: Drive metal wedge perpendicular to wood wedge
- Trim excess: Cut wedges flush with head, sand smooth
- Finish: Apply boiled linseed oil, let cure 24 hours
Common mistake: Using too small a wedge or not driving wedges deep enough. A properly wedged handle should last 5-10 years of professional use.
Face Reconditioning & Sharpening
Over time, milled faces wear smooth and blades dull. Restoration process:
| Tool | Purpose | Technique | Frequency |
|---|---|---|---|
| Mill Bastard File | Re-cut waffle pattern | File at 45° to existing pattern, consistent pressure | Every 50,000 nails or when slipping occurs |
| Sharpening Stone | Sharpen cutting blade | Maintain 25-30° bevel, consistent angle | Every 10,000 cuts or as needed |
| Flap Disc (angle grinder) | Remove severe mushrooming | Light passes, don’t overheat (discolors steel) | Only when necessary (creates heat-affected zone) |
| Emery Cloth | Polish after filing | Progress from 120 to 400 grit | After any filing/grinding work |
When to Retire a Hammer
Even the best hammers eventually need replacement. Warning signs:
- Visible cracks in head (especially around eye)
- Excessive mushrooming (>1/16″ beyond original face)
- Deep pitting from corrosion
- Loose head that can’t be re-wedged
- Handle damage that compromises structural integrity
- Changed sound when striking (indicates internal cracks)
Safety first: A failing hammer can send metal fragments flying at high velocity. When in doubt, retire the tool.
SAFETY PROTOCOLS & INJURY PREVENTION
Roofing is dangerous work, and proper tool use is critical for safety.
OSHA & SAFETY STANDARDS FOR HAMMER USE
OSHA Standard 1926.701(b) addresses hand tool safety. Key requirements:
- Employers must provide tools in safe condition
- Employees must use tools properly and inspect before use
- Damaged tools must be removed from service
- Proper PPE must be worn (safety glasses always when hammering)
- Training must be provided on proper tool use
In addition to OSHA, many unions have stricter standards. The United Union of Roofers, Waterproofers and Allied Workers recommends:
- Daily tool inspection checklist
- Mandatory safety glasses at all times on roof
- Regular ergonomics training
- Hammer weight limits based on worker size/experience
Personal Protective Equipment (PPE) for Hammer Work
| PPE Item | Purpose | Standards | Notes |
|---|---|---|---|
| Safety Glasses | Eye protection from fragments | ANSI Z87.1+ | Non-negotiable. Polycarbonate lenses only. |
| Work Gloves | Hand protection, better grip | ANSI/ISEA 105-2016 | Choose gloves that maintain hammer feel |
| Wrist Support | Prevent repetitive stress injuries | Medical device Class I | For roofers with existing issues, not prevention |
| Hearing Protection | Reduce noise exposure | NRR 25+ dB | Hammering generates 90-100 dB noise |
| Knee Pads | Comfort during kneeling work | EN 14404 | Indirect safety—reduces fatigue errors |
Worksite Safety Protocols
Tool Inspection Protocol: Before each shift, inspect hammer for: cracks, loose head, damaged grip, excessive wear. Tag and remove defective tools.
Swing Zone Safety: Maintain 10-foot swing radius clear of other workers. Use spotters when working in close quarters.
Overhead Hazard Management: Never hammer overhead without head protection. Secure loose materials that could fall.
Drop Prevention: Use tool lanyards when working near edges. Never lay hammer on sloping surface.
Weather Considerations: In temperatures below 40°F, steel becomes more brittle. Inspect more frequently. In rain, ensure grip remains secure.
TRAINING & SKILL DEVELOPMENT
Mastering the roofing hammer takes deliberate practice. Here’s a progression path from apprentice to master.
Apprentice Training Program (Weeks 1-12)
PHASE 1: FUNDAMENTALS (WEEKS 1-4)
Goal: Develop basic swing mechanics without damaging materials
- Day 1-3: Grip, stance, basic swing motion (no nail)
- Day 4-7: Driving nails into practice board (focus on consistency)
- Week 2: Proper gauge use, exposure setting
- Week 3: Basic cutting technique
- Week 4: Integration of all skills at slow pace
Metrics: 80% nail placement accuracy, 70% proper exposure, 0 damaged shingles
PHASE 2: SPEED DEVELOPMENT (WEEKS 5-8)
Goal: Increase speed while maintaining quality
- Week 5: Rhythm development (consistent timing between nails)
- Week 6: Material handling efficiency (shingle placement + nailing)
- Week 7: Cutting accuracy under time pressure
- Week 8: Full process integration
Metrics: 10 squares per day capability, 90% quality standard
PHASE 3: SPECIALIZED SKILLS (WEEKS 9-12)
Goal: Master complex roofing situations
- Week 9: Valley work (precision cutting, special nailing patterns)
- Week 10: Ridge & hip work (angled cuts, exposure consistency)
- Week 11: Flashing integration (cutting around vents, precise nailing)
- Week 12: Final assessment under job conditions
Metrics: Production-ready for all standard roofing situations
Advanced Skill Development
Beyond the basics, master roofers develop these advanced capabilities:
| Skill | Description | Training Method | Time to Master |
|---|---|---|---|
| Blind Nailing | Driving nails without looking at hammer face | Practice with eyes closed, focus on feel | 3-6 months |
| One-Hand Nail Start | Starting nail with one hand (magnetic hammer helps) | Begin with oversized nails, progress to standard | 1-2 months |
| Pattern Recognition | Identifying and correcting exposure errors immediately | Deliberate error creation and correction | 6-12 months |
| Material Adaptation | Adjusting technique for different shingle types | Work with multiple materials under supervision | 12-18 months |
| Efficiency Optimization | Minimizing wasted motion | Video analysis, motion study | 2+ years |
Common Training Mistakes & Corrections
TRAINING PITFALLS TO AVOID
Starting with wrong hammer: Apprentices should begin with medium-weight (19-20 oz), wood-handled hammer for best feedback and injury prevention.
Focusing only on speed: Quality first, speed follows. Rushing fundamentals creates bad habits that are hard to break.
Ignoring ergonomics: Teach proper biomechanics from day one. Retraining bad swing mechanics is difficult.
No maintenance training: Apprentices should learn tool care as part of skill development.
One-size-fits-all approach: Different body types require different techniques. Adapt teaching to individual.
COMPLETE BUYING GUIDE: THE ANATOMY OF A PERFECT ROOFING HAMMER
FREQUENTLY ASKED QUESTIONS (EXPANDED)
FREQUENTLY ASKED QUESTIONS
Can I use a framing hammer for roofing?
You shouldn’t. A framing hammer has the wrong face (often smooth), lacks a hatchet blade, and doesn’t have a shingle gauge. More importantly, its aggressive claw is designed for demolishing wood and will tear and damage asphalt shingles, a completely different task than working with durable metal roofs, which have their own maintenance needs like periodic painting. Additionally, framing hammers are typically heavier (22-28 oz) and designed for driving larger nails into wood, not for the precision required in roofing. Using a framing hammer on a roof will void many shingle warranties and marks you as unprofessional.
What’s the best way to use the cutting blade on a roofing hatchet?
Place the shingle on a scrap piece of plywood. Give the hatchet a single, sharp strike where you want to make your cut. It usually won’t cut all the way through on the first hit, but it will score it deeply. You can then easily bend and snap the shingle along the score line for a clean break. For thicker architectural shingles or in cold weather, you may need to score both sides. Pro tip: Keep the blade sharp—a dull blade tears rather than cuts, creating jagged edges that don’t seal properly. Sharpen with a mill file maintaining a 25-30 degree bevel.
Why do I keep getting “fish mouths” (buckled shingles) when I nail?
This is usually caused by overdriving the nail. A properly driven roofing nail should be flush with the shingle surface, not sunk into it. A milled face helps, but proper technique is key. Let the weight of the hammer do the work and learn the feel for setting the nail perfectly flush. Other causes: 1) Nail too long: Using 1¼” nails instead of 1″ on standard 3-tab shingles, 2) Cold shingles: Asphalt becomes brittle below 40°F, 3) Improper nailing location: Nails should be placed in the nail line, not above or below, 4) Hammer face worn smooth: Causes glancing blows that bend nails sideways.
How often should I replace my roofing hammer?
Depends on use and quality. For professional daily use: Economy hammers: 6-18 months, Mid-range hammers: 3-5 years, Premium hammers (Estwing, premium Vaughan): 8-15+ years. Signs you need replacement: 1) Face worn smooth (can’t be re-milled), 2) Excessive mushrooming (>1/16″ beyond original face), 3) Cracks in head or handle, 4) Loose head that can’t be tightened, 5) Gauge mechanism fails repeatedly. A quality hammer maintained properly can outlast your roofing career.
Are magnetic hammers worth the extra cost?
For most professionals, yes—especially if you work on steep roofs. Benefits: 1) Increased speed: 20-30% faster nailing on steep pitches, 2) One-hand operation: Crucial when other hand is stabilizing, 3) Reduced dropped nails: Saves time searching, prevents injuries below, 4) Better nail starting: Nail stays perpendicular for first tap. Drawbacks: 1) Magnet can collect metal debris, 2) Stronger magnets can be harder to release nail, 3) Slight learning curve. For flat or low-slope work, benefits are smaller but still present.
What’s the difference between a roofing hammer and a shingling hatchet?
Traditionally, a “hatchet” had a sharper blade for cutting and was lighter, while a “hammer” emphasized driving power. Today, the terms are used interchangeably. However, some manufacturers differentiate: Vaughan calls their wood-handled tools “hatchets” and steel-handled tools “hammers.” Functionally identical for asphalt shingle work. Regional differences exist: East Coast roofers often say “hatchet,” Midwest says “hammer,” West Coast uses both interchangeably.
Can I use a roofing hammer for other construction tasks?
Yes, but with limitations. Good for: 1) Light demolition, 2) Driving smaller nails in wood, 3) Light prying. Not good for: 1) Driving large spikes or framing nails (face pattern wrong, not enough mass), 2) Chiseling (hurts cutting edge), 3) Heavy demolition (not designed for impact). The gauge can get in the way for non-roofing tasks. Many roofers carry both a roofing hammer and a framing hammer for different tasks.
How do I choose between wood and steel handle?
Consider these factors: 1) Vibration sensitivity: Wood if you have wrist/elbow issues, 2) Durability needs: Steel if you’re hard on tools, 3) Climate: Wood can swell/shrink with humidity, steel unaffected, 4) Feel preference: Wood has more “feedback,” steel feels more direct, 5) Weight: Steel handles often heavier at same head weight. Many roofers start with wood (softer on joints) then switch to steel once technique is solid and they want maximum durability.
What maintenance does a roofing hammer need?
Weekly: Clean face and gauge of tar/debris. Monthly: Check tightness of gauge screws, inspect handle for cracks. Quarterly: Lightly sand wood handle if rough, condition leather grips. Annually: File face if worn smooth (maintain waffle pattern), sharpen cutting edge. As needed: Replace handle if cracked or loose. Storage: Keep dry, hang by handle, avoid temperature extremes. Proper maintenance can triple a hammer’s lifespan.
Are there left-handed roofing hammers?
Most roofing hammers are ambidextrous—the gauge works from either side. However, the cutting blade is typically on the right side (when holding hammer in right hand). For left-handed roofers: 1) Some manufacturers make left-handed models (blade on opposite side), 2) Many lefties learn to use right-handed hammers effectively, 3) Magnetic hammers work equally well for left/right, 4) Custom makers can create left-handed versions. If you’re left-handed, test both orientations to see what feels natural.
What nail size should I use with my roofing hammer?
Match nail size to shingle thickness: 1) 3-tab shingles: 1″ nails with ⅜” head, 2) Architectural shingles: 1¼” nails, 3) Heavy laminated shingles: 1½” nails, 4) Cedar shakes: 1½” to 2″ stainless steel or hot-dipped galvanized. The hammer face should completely cover the nail head. Using nails that are too long causes “fish-mouthing,” too short reduces wind resistance. Always use corrosion-resistant nails—aluminum for most applications, stainless for coastal areas.
How does weather affect hammer performance?
Temperature and humidity impact both tool and materials: 1) Cold weather (below 40°F): Steel becomes more brittle (risk of chipping), shingles become brittle, grip may stiffen, 2) Hot weather (above 90°F): Asphalt softens (easier to damage), grip may become slippery with sweat, 3) Rain/wet conditions: Wood handles swell slightly (can be good for tight heads), grip traction critical, metal can rust if not dried, 4) High humidity: Can cause condensation inside tool storage. Adapt technique and maintenance to conditions.
What’s the proper grip for a roofing hammer?
The “power grip”: Hold near end of handle (not choked up). Thumb lies along handle, not wrapped around. Grip firmly but not tightly—imagine holding a bird: tight enough it can’t escape, loose enough not to crush it. Common mistakes: 1) Death grip: Causes fatigue, reduces control, 2) Choking up: Reduces swing power, 3) Wrong hand position: Thumb wrapped reduces wrist action. For detailed work (valleys, hips), you may choke up slightly for better control.
Are there union requirements for roofing hammers?
Some union agreements specify tool requirements: 1) Quality minimums: Must be forged, not cast, 2) Safety features: No excessive mushrooming, secure handles, 3) Weight limits: Some locals limit maximum weight for ergonomics, 4) Inspection requirements: Regular tool inspections may be mandated, 5) Apprentice tools: Specific requirements for training hammers. Check your local union agreement. Even non-union, following union standards is good practice for safety and professionalism.
Can I customize my roofing hammer?
Yes, common customizations: 1) Handle shaping: Sand wood handle to fit your hand perfectly, 2) Grip tape/wrap: Tennis racket tape or specialized grip tape for better traction, 3) Face modification: File specific pattern preferences, 4) Weight adjustment: Adding/removing metal from head (advanced, affects balance), 5) Personal markings: Engraving for identification, 6) Gauge enhancement: Adding markings for specific exposures. Customization can improve comfort and performance but may void warranties.
How many nails can a roofing hammer drive before wearing out?
Varies by quality: 1) Economy hammer: 50,000-150,000 nails, 2) Mid-range: 300,000-500,000 nails, 3) Premium (Estwing, Vaughan premium): 750,000-1,500,000+ nails. These estimates assume proper maintenance (face filing when worn). A professional roofer might drive 70,000-100,000 nails per year. Thus: Economy lasts 6-18 months, Mid-range 3-7 years, Premium 8-20+ years. The face wears faster than other components—regular filing extends life significantly.
FINAL VERDICT: FINDING YOUR FOREVER HAMMER
A roofer’s hammer is a tool of the trade that often becomes a trusted companion for years, even decades. Finding the one that perfectly suits your swing, your body, and your style of work is a rewarding process that pays dividends in productivity, quality, and physical well-being.
SUMMARY RECOMMENDATIONS BY USER TYPE
THE APPRENTICE/LEARNER: Start with the Bostitch RH-S18 or similar mid-range hammer. Its lighter weight (18 oz) reduces fatigue while learning, the adjustable gauge helps develop consistency, and the price point won’t break the bank as you’re starting out. Upgrade to a premium hammer once your technique is solid and you know your preferences.
THE PROFESSIONAL PRODUCTION ROOFER: For daily use on high-volume asphalt shingle work, the AJC Magnetic Roofing Hatchet offers the best combination of speed and durability. The magnetic face increases productivity significantly, especially on steep pitches, while the forged steel construction withstands professional abuse. Pair it with proper safety equipment from our guide on the best roof harnesses for steep work.
THE TRADITIONAL CRAFTSMAN: If you value feel, comfort, and time-tested design, the Vaughan R21 Shingling Hatchet is unparalleled. The hickory handle provides superior vibration damping for long-term joint health, and the forward balance makes for effortless nailing. This is the choice for roofers who plan decades-long careers and want to minimize repetitive stress injuries.
THE DURABILITY-FOCUSED PRO: For those who are hard on tools or work in extreme conditions, the Estwing E3-S is indestructible. Its single-piece forged construction survives drops, prying, and general abuse that would destroy other hammers. While it transmits more vibration, the shock-reduction grip mitigates this somewhat. This is the “buy it for life” option.
THE SPECIALIST/CRAFTSMAN: If you work with slate, tile, or other specialty materials, or simply appreciate fine toolmaking, the Picard Roofer’s Hammer represents the pinnacle of European craftsmanship. Its specialized design excels for slate work, and the leather grip develops a unique patina over years of use. This is more than a tool—it’s an heirloom.
THE DIY HOMEOWNER: For occasional repairs or small projects, the Bostitch RH-S18 offers excellent value. It has all the features needed for proper roof work without the professional price tag. Pair it with some quality roofing tape for comprehensive repair capabilities.
The 10-Year Cost Analysis: Quality Pays
Let’s examine the true cost of hammer ownership over a decade of professional use:
| Hammer Type | Initial Cost | Replacements Needed | Total 10-Year Cost | Nails Driven* | Cost Per 10,000 Nails | Productivity Impact |
|---|---|---|---|---|---|---|
| Economy ($25) | $25 | 6 replacements | $175 | 700,000 | $2.50 | -10% (poor grip, frequent maintenance) |
| Mid-Range ($45) | $45 | 2 replacements | $135 | 1,000,000 | $1.35 | Neutral |
| Premium ($80) | $80 | 0-1 replacement | $80-$160 | 1,500,000+ | $0.53-$1.07 | +15% (better features, less fatigue) |
| Magnetic Premium ($90) | $90 | 0-1 replacement | $90-$180 | 1,500,000+ | $0.60-$1.20 | +25% (speed increase + other benefits) |
*Assumes 100,000 nails/year professional use. Productivity impact affects overall job completion time.
The analysis shows: Premium hammers cost less per nail driven and increase productivity. The initial higher investment pays dividends over time. For a professional roofer, the time savings alone from a magnetic hammer could justify its cost within weeks.
The Human Factor: Health & Longevity
Beyond economics, consider the health implications. A roofer swinging a hammer 50,000+ times per year subjects their body to significant stress. The right hammer can mean the difference between a 30-year career and being forced out by injury at age 45.
INJURY PREVENTION FEATURES TO PRIORITIZE
For those with or at risk of repetitive stress injuries:
- Vibration damping: Wood handles first choice, quality composites second
- Proper weight: Not too heavy for your frame and strength
- Good balance: Reduces muscle strain from correcting swing
- Comfortable grip: Reduces grip pressure needed
- Magnetic feature: Reduces fine motor strain of positioning nails
Listen to your body: If you experience persistent pain, numbness, or tingling, reassess your tool choice immediately. Early intervention prevents chronic conditions.
The Future of Roofing Hammers
Technology continues to evolve roofing tools. Trends to watch:
- Smart hammers: With sensors to track technique, count nails, detect improper strikes
- Advanced composites: New materials offering wood-like feel with steel-like durability
- Enhanced ergonomics: Biomechanically optimized shapes based on motion studies
- Integrated systems: Hammers that work with automated nail dispensers
- Adaptive tools: Adjustable weight/balance for different tasks or user fatigue levels
- Sustainable materials: Handles from rapidly renewable sources, recycled steel
While traditional designs will likely remain dominant for years, incremental improvements continue to make roofing work safer and more efficient.
Final Thoughts from 25 Years on the Roof
After a quarter-century in roofing, swinging hammers from the Florida coast to the Canadian border, here’s what I’ve learned:
- Your hammer should feel like part of your arm. If you’re constantly aware of it, it’s not right for you.
- Quality shows in the details. Look at how the gauge moves, how the handle meets the head, the consistency of the milling.
- Maintenance matters as much as initial quality. A $25 hammer well-maintained can outperform a $100 hammer neglected.
- There’s no single “best” hammer. The best hammer is the one that works best for YOU—your body, your style, your work.
- Respect the tool. A roofing hammer is a precision instrument, not a pry bar or demolition tool (though it can do those in a pinch).
- Invest in yourself. Your tools are an extension of your skills. Quality tools make quality work easier.
- Pass it on. When you find what works, share that knowledge with the next generation of roofers.
Your roofing hammer will be with you through blazing heat and freezing cold, through simple garage roofs and complex whole-house replacements. It will drive the nails that protect families from the elements for decades. Choose wisely, maintain diligently, and swing true.
May your hits be straight, your cuts be clean, and your career be long.
Affiliate Disclosure: This post contains affiliate links. If you make a purchase through these links, we may earn a small commission at no additional cost to you. This helps us continue to produce in-depth, experience-driven reviews based on real-world professional use. We only recommend tools we would use on our own job sites.
Professional Disclaimer: This guide represents professional opinions based on 25 years of roofing experience. Local building codes, manufacturer instructions, and specific site conditions may require different approaches. When in doubt, consult with a licensed roofing professional in your area. Roof work can be dangerous—always prioritize safety, use proper fall protection, and follow all OSHA guidelines and manufacturer instructions.
About the Author: With over 25 years in the roofing industry, I’ve installed and repaired every major roofing system type across residential, commercial, and industrial applications. My experience includes union apprenticeship training, running my own roofing company, and consulting for tool manufacturers on ergonomics and design. I currently train new roofers and write about roofing techniques and tools.